In the previous chapter, we delved into the many content experiences offered by Microsoft SharePoint Premium, designed to elevate document understanding and management within organizations, such as: using AI to identify and tag images, ability at add annotations to documents and ability to redact content.
In this chapter[RK2] , we delve into the content processing capabilities offered by SharePoint Premium, designed to enhance and automate document management one step further. These features are crucial for users seeking to streamline their document management operations, improve productivity, and automate compliance with data regulations.
The content processing features of SharePoint Premium includes include:
- Optical Character Recognition (OCR) – Integrating advanced OCR technology, empowering users to extract text from images and scanned documents.
- Processing Rules – Leverage Processing Rules to create bespoke workflows, automating document processing with precision.
- Merge and Extract PDFs – SharePoint Premium simplifies PDF management by enabling the consolidation of multiple documents into a single file, using the merge feature.
- PII Detection (Personal Identifiable Information) – With PII Detection capabilities, SharePoint Premium uses advanced machine learning algorithms to identify and extract sensitive information within documents.
OCR
Optical Character Recognition (OCR) – renders content searchable for use by SharePoint services, primarily SharePoint Search. By unlocking textual content (either digital or handwritten) within documents and images, users can locate pertinent information, improve productivity and improve decision-making. Furthermore, with the introduction of Generative AI technologies such as Copilot for Microsoft 365, having the ability to index the entire contents of a document will greatly improve the information generated.
OCR is relatively seamless for an end-user. Shortly after a document or image has been uploaded to a SharePoint library, SharePoint Premium processes the file automatically and using Microsoft Azure AI technologies extracts the text to a usable, indexed format.
The process of Document OCR vs. Image OCR differs slightly with SharePoint Premium, as outlined below.
- Document OCR – When a user uploads a document (such as a PDF) that doesn’t contain a ‘digital text layer’ (i.e. it hasn’t been previously been processed by an OCR process), then SharePoint Premium OCR will process the document and add an in-line digital text layer to the document. The document is then indexed by SharePoint, and the content within the PDF can be used within end-user search, and search-drive solutions (such as Copilot for Microsoft 365 and Microsoft Purview DLP).[RK3]
The following image shows a PDF document within a SharePoint document library that has been OCR i.e. it now has a text layer. As you can see, you can select / highlight content within the document which means this content can be indexed and used when returning search results or when using AI solutions.

Figure 7.1 – A PDF document showing highlighted text that has been processed by SharePoint Premium OCR
Note
The best way to know if a document has been OCR’d is to check the file and to try and select specific text areas within the content. If they are selectable, the document has been OCR.
- Image OCR is similar to Document OCR, however for an image rather than adding a digital text overlay, SharePoint Premium scans the image, extracts any text that it is able to identify, and adds the extracted text to a SharePoint column called Extracted Text[RK5] (the SharePoint column is added automatically by the SharePoint Premium service).[RK6]
The following image shows a screen capture of the packt website, which has been saved as a PNG file.

Figure 7.2 – An image of the packt website saved as a PNG file that has been uploaded to a SharePoint document library
The image has been uploaded to SharePoint [RK7] document library and processed via SharePoint Premium OCR. As you can see, the ‘Extracted Text’ column is visible and has been populated with the output of the OCR process.

Figure 7.3 – A SharePoint document library with the ‘Extracted Text’ column showing the content that has been extracted from the image using SharePoint Premium OCR
This concludes an overview of what SharePoint Premium OCR is and how it is beneficial to an organization, we now move onto how SharePoint Premium OCR is configured at the SharePoint Site Collection level.
Configuring SharePoint Premium
This section outlines the configuration requirements within SharePoint, including how to specify which SharePoint Site Collections are enabled for SharePoint Premium OCR. This section also outlines the supported file types and languages within SharePoint Premium OCR.
Specifying SharePoint Sites[RK8]
Previously, in Chapter 2, we enabled SharePoint Premium OCR at the tenant configuration level – from within the Microsoft 365 admin center, and setup the required Azure subscription to act as the billing mechanism. This section outlines the next step of specifying which SharePoint Site Collections will be enabled for SharePoint Premium OCR.
From the Microsoft 365 admin center, a Microsoft 365 administrator will need specify which SharePoint Site Collections are enabled for SharePoint Premium OCR. As you can see from the image below, the Microsoft 365 administrator can specify several different options:
- All sites
- Selected sites (up to 100)
- No sites

Figure 7.4 – Microsoft 365 Admin Centre showing the OCR enabled panel from the SharePoint Premium setup screen
Whilst selecting ‘All sites’ may appear to be the easiest option (and why wouldn’t you want all your content fully indexed and searchable!), remember, each page costs money to OCR and to avoid unnecessary costs, it is possible to specify up to 100 SharePoint Site Collections where you want OCR to be enabled. [RK9]
Integrating OCR with Microsoft Purview[RK10] [RK11] [AR12]
Microsoft Purview is a comprehensive set of security and compliance features within Microsoft 365 designed to help organizations manage, govern, and protect their data across various environments.
Whilst OCR appears simple and self-explanatory with minimal involvement required from neither an admin or end-user, the automated processing and search-driven capabilities derived from OCR is relatively powerful.
As an example, an organization that is highly regulated or more mature with their document management processes and uses the capabilities found within Microsoft Purview, SharePoint Premium OCR enables Microsoft Purview to use the extracted OCR information from within documents and images to detect sensitive information – this significantly improves the ability to be able to programmatically detect and block sensitive information from leaving an organization.
For a Data Protection Officer (DPO) the ability to have a digital text layout within documents and images, along with existing digital information such as Microsoft Teams chat and channel messages and Exchange, provides a significant step forward with being able to protect and classify content across the entire Microsoft 365 suite of products.
As an example; a common use of using a combination of SharePoint Premium OCR and Microsoft Purview would be for credit card information. Retail and financial organizations are highly regulated with credit card information accounting for a significant proportion of information obtained and retained. Whilst processes are typically in place for many organizations to avoid obtaining and storing this information outside controlled methods, credit card information can easily be received via email as an image (i.e. a customer has taken a photo and unbeknown to them, has sent the photo to the organization). If you’ve configured a Microsoft 365 Data Loss Prevention (DLP) policy that defines sensitive information and included a data classifier such as the “Credit Card” sensitive information type, in this scenario, Microsoft Purview would identify and block this content prior to it being seen by an employee.[RK13]
Configuring SharePoint Premium OCR for Microsoft Purview
For sites that are not configured for SharePoint Premium OCR the Microsoft 365 tenant administrator needs to, via the Microsoft Purview admin center, configure Microsoft Purview to use OCR on those sites.
The Microsoft 365 Compliance Administrator, via the Microsoft Purview Admin Centre will need to specify which SharePoint sites to include for Data Loss Prevention (DLP):
The following steps can be used to configure Microsoft Purview for OCR.:
- In the Microsoft Purview compliance portal, go to Settings.
- Select Optical character recognition (OCR) to enter your OCR configuration settings.
- Select the locations where you wish to scan images.
- Select the distribution groups that you want included or excluded from OCR scans.
- Choose Done[RK14] [AR15]

Figure 7.5 – Microsoft Purview admin center showing the enablement of OCR within Microsoft Purview
Note
The OCR scan will be restricted to the locations you define. For example, if OCR scanning is scoped to just two SharePoint sites and a compliance policy is applied to all SharePoint sites, only the two SharePoint sites selected will be scanned for sensitive information within those documents.
Processing Rules
Processing Rules is a feature of SharePoint Premium that enables a user to create rules that direct where a document is routed to. Rules are based upon the metadata of the document.
If you are familiar with SharePoint On-Premises, a similar feature ‘Content Organizer Rules’ exists – and whilst these are still available today for both SharePoint On-Premises and SharePoint Online. The configuration and features are somewhat limited compared with SharePoint Premium Processing Rules – think of SharePoint Premium ‘Processing Rules’ as the ‘Modern Content Organizer Rules’ engine![RK17]
Using Processing Rules, you can quickly create simple, bespoke document workflow processes within the context of the SharePoint document library, without needing to create complex Power Automate Workflows which, for the untrained user, can take longer to create, build, and test.
Figure 7.6 – Outlining the 6 steps to creating a SharePoint Premium Processing Rule
Conditions, or ‘Take action [RK20] when’ as labeled in SharePoint, are triggers that define when the rule initiates. Triggers include:
- When data in a column changes
- When a new file is added
- When a file is deleted
When a trigger condition is met, the rule can then start you’re a rule to automate tasks such as:
- Sending a notification (email)
- Moving or copying a file
- Setting a Content Type
- Creating a Translated copy
- Setting a Sensitivity Label
- Setting a Retention Label
Figure 7.7 – Example use of Content Rules to move documents from one library to another
Why use Processing Rules?
The use of SharePoint Premium Processing Rules can be highly beneficial for several reasons:
- Organizing Documents:
- Ensures that documents are consistently categorized and stored in the correct location without relying on manual intervention, reducing the risk of human error.
- Saves time and effort for users who would otherwise have to manually move documents to their correct locations.
- Document Translation:
- Provides the ability to automatically translate a copy of the document.
- Ideal for a multi-national / multi-lingual organization that requires the need to ensure documents received, sent, or viewable by internal users are in the user’s native language.
- Improving Searchability and Retrieval:
- Provides the ability to automatically set a SharePoint Content Type.
- Documents can be routed based on metadata, making it easier to find and retrieve documents later. For example, all invoices can be routed to a specific library based on their metadata tags, for further processing.
- Consistent metadata and organized content improve the efficiency of search functions within SharePoint, allowing users to find documents quickly and easily.
- Compliance and Governance:
- Ensures that documents are stored in compliance with organizational policies and regulatory requirements. Retention and Sensitivity labels can be applied to documents – a significant feature which was previously something only an E5 licensed user would have the ability to do.
- Can help maintain audit trails by ensuring documents are properly stored and tracked, which is crucial for compliance and governance.
Now we understand why we should use Processing Rules, the following section outlines when to use them in real life.
When to use Processing Rules
In the previous section we learnt ‘why’ you should consider the need to use processing rules. In this section, we uncover ‘when’ to use Processing Rules and provide some typical use case examples:
- Invoice Management:
- A company receives invoices from various vendors. By setting up Content Organizer Rules, invoices can be automatically routed to specific libraries or folders based on the vendor’s name, invoice date, or value – streamlining the accounts payable process.
- This ability is useful if different teams/employees perform different roles based on the supplier or invoice value as an example.
- Employee Onboarding:
- HR departments can use Content Organizer Rules to manage onboarding documents.
- When new hire documents are uploaded, they can be automatically routed to the appropriate folders based on the department or job role, ensuring that all relevant documents are organized and accessible for onboarding processes.
- Legal Document Handling:
- Law firms can use Processing Rules to manage case files.
- Documents can be routed based on case numbers or client names, ensuring that all related documents are stored together and easily retrievable for legal proceedings.
- Project Documentation:
- In a construction company, project documentation like blueprints, permits, and reports can be automatically routed to specific project folders based on project codes or stages, facilitating better project management and document control.
- Records Managers:
- Records managers within an organization can receive documents from across the organization automatically; this could include a copy each time a document has been sent to a customer / client / patient or when a document has reached a particular point of a pre-defined document lifecycle management plan.
- Approval Processing:
- Where a multi-step approval process is needed, you can design your solution to use Processing Rules to move the document from one library to another; rather than building a multi-stage Power Automate Workflow that would require a full end-to-end approval process.
Now we understand when we should use Processing Rules, the following section outlines how to create them.
Creating Processing Rules
Content Processing rules are created within the SharePoint Document Library. Up to 15 rules can be created per Document Library, by users with at least the SharePoint Edit permission to the List or Library.
The process to create a rule is as follows:
- In the document library, select Automate | Rules | Create a rule

Figure 7.8 – Image showing the Create a rule action from within a SharePoint document library
- When creating a Processing Rule, you are presented with the following options:
Figure 7.9 – Creation of a new Processing Rule from a SharePoint Library
Let us delve deeper into each of these options:[RK24]
- Data in a column changes[RK25]
- Date Column – allows you to select a relative value
- Text Column – allows you to specify the text value
- A new file is added
- Send an email to – allows you to send an email to an individual
- Copy file to – allows you to copy a file from one document library to another
- Move file to – allows you to move a file from one document library to another
- Set Content Type to – allows you to set the Content Type
- Create a translated copy in – allows you to create a translated version of the document
- A file is deleted
- Send an email to – allows you to send an email notification
This concludes the information on how to create a rule; the next sections focus on creating each of the rules in detail.
Action – Send an email to
When the Send an email to action is used, the user is first presented with the option to choose who to send the email to:
- On the Create a rule page, selectA new file is added[RK26] .
- Select Choose action[RK27] , and then send an email to from the dropdown[RK28]
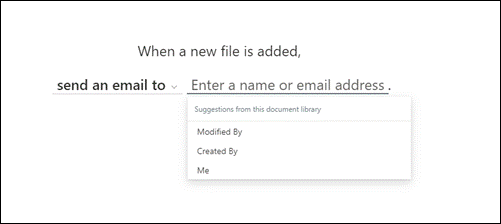
Figure 7.10 – Creation of a new rule with the ‘send an email to’ action selected
- In the dropdown, you will see three options:
- To send an email to the last user who modified the document, select Modified By
- To send an email to the person who uploaded the document, select Created By
- To send an email to yourself, select Me
The e-mail received cannot be modified/edited, and looks like:

Figure 7.11 – Example email from the Content Rule ‘send an email to’ action
This concludes the steps to create a rule that sends an email.
Action – Move or copy a file to
When the Move or Copy a file to action is used, the user is first presented with the option to choose an existing SharePoint Site Collection:
- On the Create a rule page, selectA new file is added.
- Under When a new file is added select Choose action, and then:

Figure 7.13 – Image showing the Process Rule ‘Choose action’ drop down options
- To copy a file, select copy file to
- To move a file, select move file to
- Next, select Enter a site name or address, and then select the site that contains the document library you want the file moved or copied to.
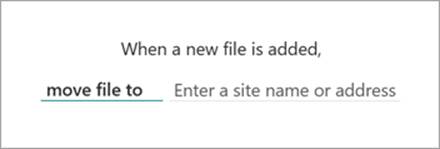
Figure 7.14 – Image showing the Process Rule ‘Enter a site name or address’ option
From here, you can:
- Select from the list of recent sites or
- Enter the name or URL of another site
- Select Choose a library, and then select the document library you want the file moved or copied to.

Figure 7.15 – Image showing the Process Rule ‘Choose a library’ option
From here, you can either select from the list of suggested libraries or enter the name of another library.
- When your rule statement is complete, select Create
When a file is moved, you have the ability to see the update in the source library activity feed. The updates occur in both the source library and the target library.
To view the activity feed, within the document library, in the upper-right corner of the page, select the details pane icon[RK29] .

Figure 7.12 – Image showing a document library, highlighting the details pane
This concludes the steps to create a rule that sends an email.
Action – Set a content type to
When the Set a content type to action is used, the user is presented with several options to configure the rule.
- On the Create a rule page, selectA new file is added.
- Under When a new file is added select Choose action, and then set content type to
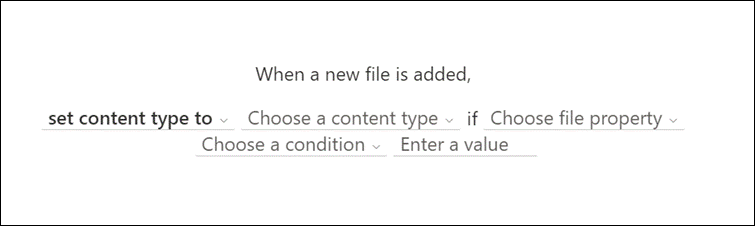
Figure 7.16 – Image of the Processing Rule creation screen for choosing the type of rule
- From the Choose a content type drop down, select the applicable content type for the file. Only content types available within the document library [RK30] will be available for selection.
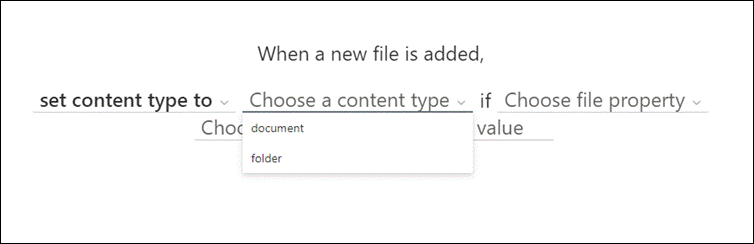
Figure 7.17 – Image of the Processing Rule creation screen for choosing a content type
- From the Choose file property dropdown, select the most applicable property that you wish to base your rule on.

Figure 7.18 – Image of the Processing Rule creation screen for choosing the file property
- Select Choose a condition, and then select the appropriate condition.

Figure 7.19 – Image of the Processing Rule creation screen for choosing the condition
- In the Enter a value field, enter the appropriate value.
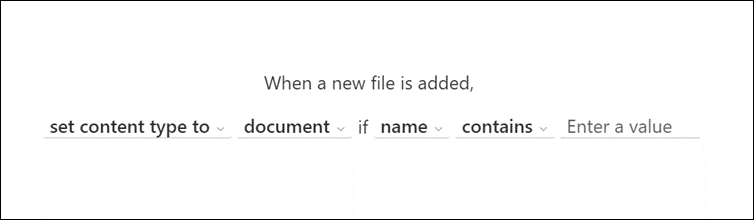
Figure 7.20 – Image of the Processing Rule creation screen for choosing the conditional value
- Once complete, select Create.
This concludes the steps to create a rule that sets a content type to a document.
Action – Create a translated copy in
When the Set a content type to action is used, the user is presented with several options to configure the rule, including the content type to set to and the conditions to base the rule from:
- On the Create a rule page, selectA new file is added.
- Under When a new file is added select Choose action, and then Translate document
This concludes the steps to create a rule to translate a document.
Manage Processing Rules
SharePoint Premium Processing Rules can be managed from within the SharePoint Document library from where they are created from.
- In the document library, select Automate | Rules | Manage rules.
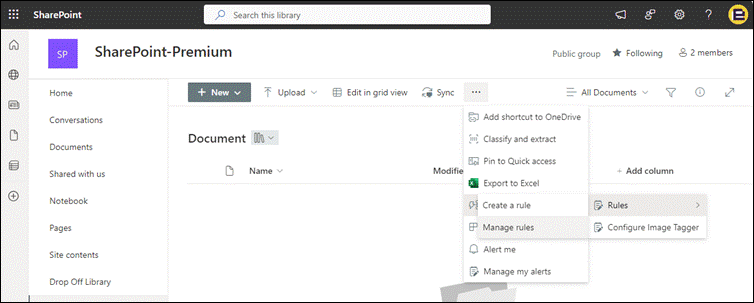
Figure 7.21 – Image showing how to access the Processing Rules ‘Manage rules’ interface
- From the Manage rules page, you can see the rules that have been created. From within here you can turn on or off a rule or create a new rule.
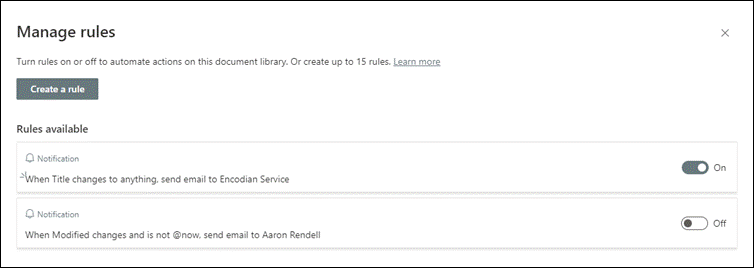
Figure 7.22 – Image showing the Processing Rules ‘Manage rules’ interface
This concludes the steps to managing Rules.
Merge and Extract [RK31] PDFs
The Merge and Extract PDFs feature with SharePoint Premium simplifies PDF management by enabling the consolidation of multiple documents into a single file, using the merge feature. On the flip side, users can effortlessly split/extract specific sections or pages from PDFs using the extract feature.
The merge option allows you to combine PDF files into a new PDF file stored in SharePoint or OneDrive. You can easily organize, share, and send multiple PDF files as a single file, allowing you to better organize the information you want to view or share with others.
The extract option lets you split a PDF file into multiple PDF files. You can quickly share individual pages from a larger PDF file into multiple smaller files that let you tailor the information you want to view or share with others.
Merging PDF files
To merge PDF files, follow these steps:
- From your SharePoint document library, open one of the PDF files you want to combine, so that it loads in document preview mode.
- At the top left of the screen, using the quick link icons, select Merge PDF pages into a new PDF.
Figure 7.23 – Image of a PDF in document preview mode with the ‘Merge PDF’ button highlighted
- Select the files you wish to combine, and then save the merged file to the document library you want it saved in.
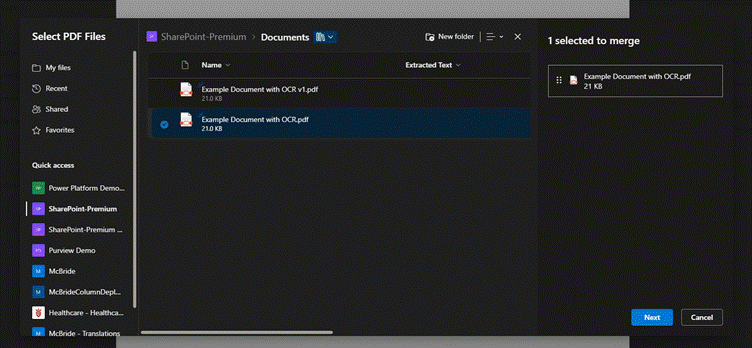
Figure 7.24 – Image of the PDF Merge interface
Next, let’s look at how to extract PDF files.
Extracting PDF files
To split a PDF file into smaller files, the following steps are required:
- From the SharePoint document library open the PDF file you want to split.
- At the top left of the screen, select More options and select Extract.
Figure 7.25 – Image of the PDF document viewer with the ‘Extract PDF’ option selected
- Select the page you want to extract, and then select Extract.
Figure 7.26 – Image of the Extract PDF selection page
Summary
In this chapter, we have discussed and outlined several features within SharePoint Premium to assist and automate document management and content processing business solutions. These features streamline how organizations manage vast amounts of content, ensuring efficient workflows, enhanced collaboration, and regulatory compliance. By integrating advanced tools like Optical Character Recognition (OCR) and automation rules, SharePoint Premium significantly enhances the way businesses handle their documents.
One of the key capabilities explored is OCR, which allows for the extraction of text from scanned images, PDFs, and other non-editable files. This functionality is crucial for organizations dealing with large volumes of physical documents, enabling the conversion of printed text into searchable and editable content. Understanding the configuration requirements and use cases for OCR ensures businesses can unlock the full potential of their document libraries by making information more accessible and actionable.
Additionally, we delved into the configuration of processing rules and their role in automating content workflows. By setting specific triggers and conditions, organizations can automate repetitive tasks like document classification, routing, and retention policies. This reduces manual intervention, increases productivity, and ensures consistency in managing digital assets. Features like the merging and extraction of PDFs further augment these workflows by simplifying document compilation and segmentation, offering flexible solutions for managing complex documents in a digital-first environment.
- In the next chapter we dive into the capability of document translation using AI – automating translation capabilities for various types of documents, including text, Office documents, PDFs, and more.
[RK1]‘Building…’? As I had mentioned earlier, using gerunds (-ing verbs) helps make headings more descriptive and actionable
[RK2]In the previous chapters, we had provided a small recap of what was covered earlier / previous chapter and linked it with the topic of the current chapter. Let’s do the same here too to establish a better flow.
[RK3]I think this is the problem statement that SP premium and OCR intends to solve. Should we start the section with this and then introduce OCR as a solution to this problem?
[RK4]I feel it would help to add a clearer structure to this image by adding a lead-in and then elaborating a bit more on it.
[RK5]I’ve adjusted it to match the exact casing as on the screen.
[RK6]It will help to add a simple lead-in here informing the readers that we’re going to look at an example.
[RK7]Is the image supposed to be uploaded to a particular location/directory?
[RK8]Since all three sub-sections are very small, should we add a common H2 heading for all three and include these three sections under it without a separate heading for each? You can introduce the three sections and talk a little about them before diving deeper into each topic.
[RK9]Just like a few images that were flagged in the previous chapters, this one has unclear text. We’ll need to replace it with one that is clear. If you only wish to show the window on the right, can we only crop and show that part so the text is readable?
[RK10]‘Integrating OCR with Microsoft Purview?
[RK11]Also, will our target audience be aware about Microsoft Purview and what it does?
[AR12]Added an overview section.
[RK13]Have we defined or covered DLP condition earlier? If not, it would be good to do it here (may be in a callout box). Also, this sentence reads a bit complex. Kindly simplify for clarity.
[RK14]This is not visible in the screenshot
[AR15]Updated.
[RK16]Clearer screenshot needed.
[RK17]This entire chunk is one single sentence that might read confusing to many. Let’s split it into two or three simpler sentences.
[RK18]Is this image created by you or sourced from an external source?
[AR19]Created by me.
[RK20]Screen-text terms?
[RK21]Same as before.
[AR22]I created this.
[RK23]Moved the figure here as I felt it fits best here, after a direct lead-in. It looked abrupt at the end of the section.
[RK24]Added a simple lead-in. Please check if okay.
[RK25]Kindly confirm whether this and other terms/options are screen-text. If so, they all will be styled using P-bold. For now, I have applied P-bold throughout. Please ensure that the casing matches exactly as they appear on the screen.
[RK26]Isn’t this step before the ‘Send an email to’ step?
[RK27]Where does this option appear? Its not visible in the screenshot
[RK28]Is this correct?
[RK29]Zoom in the screenshot to only show this. The rest of the text is unreadable.
[RK30]We’ve used both ‘Document Library’ in title case and ‘document library’ in lower case throughout the chapter. Kindly check which is correct and make it consistent throughout.
[RK31]‘Merging and extracting..’?
[RK32]The said option is not visible clearly. Kindly zoom in more to focus on it
[RK33]Text not visible
[RK34]No text is visible.
